The Logic graph
The Logic panel shows the map's entity I/O as a graph. Every wired entity and every logic entity is a node, and every connection is a wire from an output pin on the right of one node to an input pin on the left of another.
The graph shows the same outputs the Inspector edits, so a change in one shows in the other at once. The map, the Godot build and the game work exactly the same whether you use the graph or not.
Opening it
Choose View > Panels > Logic.
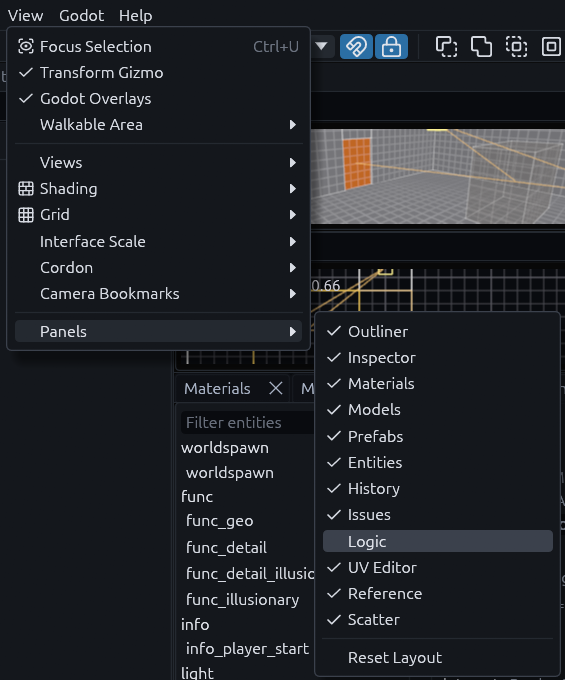
It opens next to Materials below the views and grows that dock to about half the middle of the window, since a graph needs room. Drag the divider or the tab to change that.
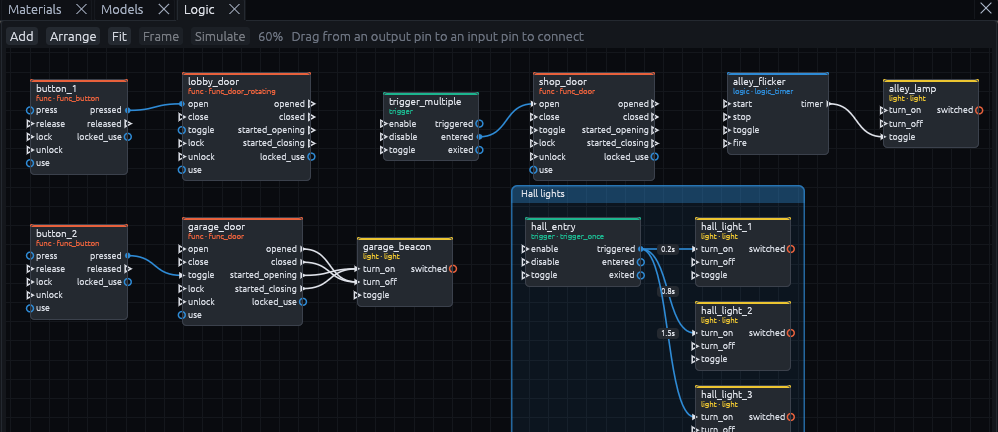
Reading the graph
| What you see | What it means |
|---|---|
| Node title | The entity's targetname, else its name from Rename, else its classname. Below it are the category and the classname |
| Gray lines under the title | The settings that differ from the entity's defaults, like max 3, wait 2 s or once, cut to two short lines. A node without them is at its defaults. The Inspector shows all of them |
| Header color | The category: the definition's group, else the classname's first word, so logic_relay is logic. See Colors |
| Pins | Inputs on the left, outputs on the right, from the entity definition plus any name the map already uses on that entity. A filled pin has a wire. Hover a pin for its type and the values it passes |
| Yellow pin name | The name is not in the entity's definition, the Issues panel warns about it too |
| Wire label | The delay, once or how many times it may fire, and the parameter, when they are set. Hover a wire for its output, target, input and delay in full |
| Blue node and wire | A target only the running game resolves, such as !player, @enemies, a node path or a wildcard like door_* |
| Red node, dashed red wire | A targetname no entity has, usually a typo |
Only wired entities and logic and math entities get a node. Select any other entity, in a view or the Outliner, and it shows up too, ready to be wired.
Colors
Colors help you scan a big graph, but every color also comes with a name or a shape, and the palettes stay apart for the common kinds of color blindness.
| Category | Color |
|---|---|
| logic | blue |
| math | orange |
| trigger | bluish green |
| func, doors, buttons and movers | vermillion |
| light | yellow |
| env | teal |
| game | sky blue |
| prop | pink |
| npc | reddish purple |
| info | gray |
| Pin type | Color |
|---|---|
| pulse, an event without a value | white |
| bool | vermillion |
| int | sky blue |
| float | bluish green |
| string | pink |
| vector3 | yellow |
| color | reddish purple |
| node, such as the activator | blue |
| variant, any value | gray |
Pins that pass a value are circles, pulses are triangles. A wire takes the color of the output it starts at. A
category of your own, set with the group of a definition, gets a color of its own too.
Wiring
Drag from an output pin to an input pin. While you drag, the pins the wire fits get a ring, and the pin it would end on fills in. Let go and the connection is added to the source entity's outputs.
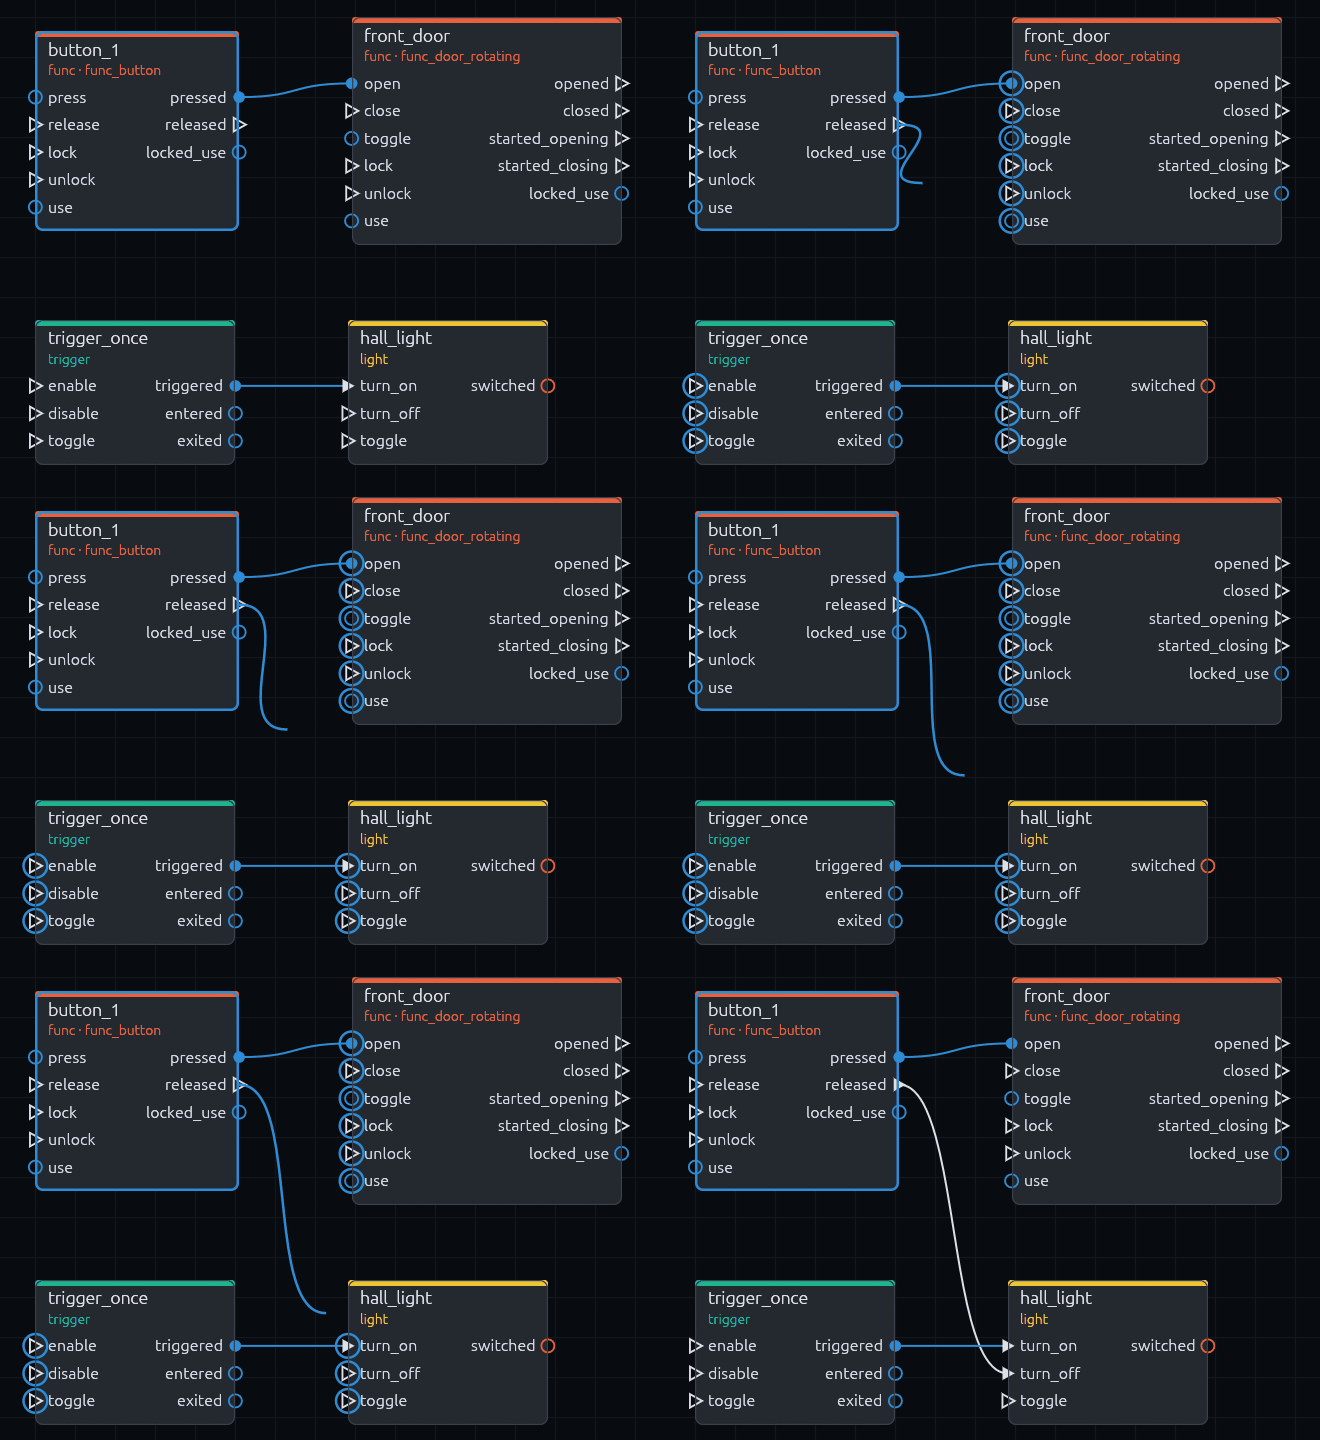
A pulse fits any pin and a value fits a pin of its own type, so an activator node does not fit an int input. (An
int also fits a float or bool pin and the other way round, and a variant fits anything.) Any pin still takes the wire,
the names in entity I/O are only checked when the game runs.
A target without a targetname gets one in the same step: the name you gave it with Rename in the Outliner, so a light
you called lamp becomes the target lamp, else a free one like door_2. A name another entity has gets a number
after it.
You can also drop the wire somewhere else:
- On a node's title, to pick from all its inputs or type any name.
- On empty space, to add a logic entity there, already wired to the pin you dragged from.
Adding logic entities
Right click empty space, or press Add at the top left of the panel, to add a logic entity without a wire.
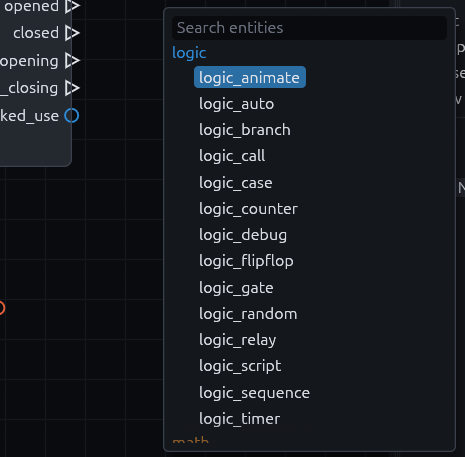
Without a search the list is grouped by category, logic and math first, then other entities that have inputs or outputs. Type to search all of them: classes whose name starts with or contains the text come first, then those whose category or description does. The up and down arrow keys move the highlight and Enter adds that class.
New entities are point entities, and the Godot build makes a node for each, so they need a place in the map. They go
on a layer called Logic, next to the entity they are wired to, or in front of the 3D view's camera. Each gets a free
targetname at once, like relay_2, which titles its node. Change it in the Inspector, since Rename only sets the
Outliner name.
Note
Without the Gameplay entities pack there are no logic entities to add. The Add menu then offers to install it.
Editing a connection
Click a wire and a box at the top right of the graph lets you edit its output, target, input, parameter, delay and times. Its Delete button, or the Delete key while the pointer is over the graph, removes it.
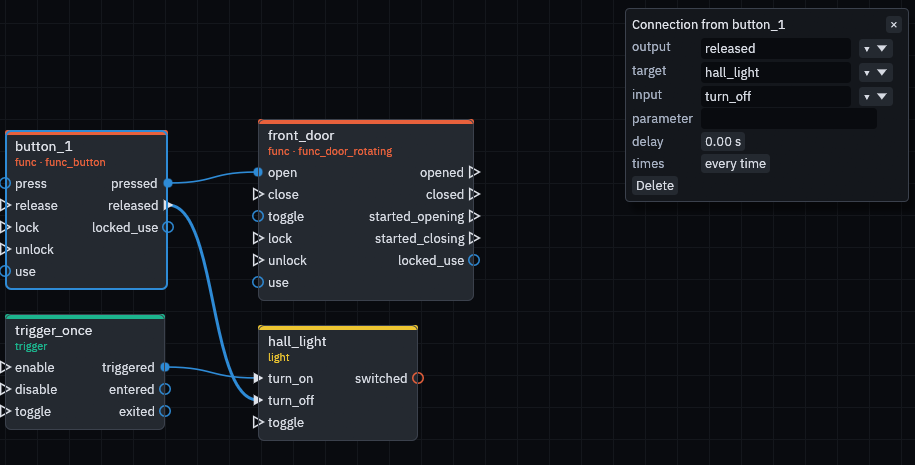
Right click anywhere along a wire, not only on its label, for Edit Connection and Delete Connection. Every change is one step in History, so undo works as everywhere else.
The node menu
Right click a node for what to do with its entity.
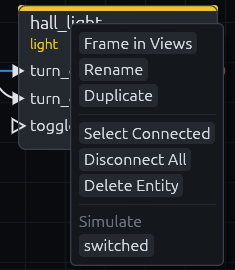
| Item | Does |
|---|---|
| Frame in Views | Selects it and moves the views to it, like a double click |
| Rename | Renames the entity in the Outliner. The node is titled by the targetname when there is one, so the name shows there only for an entity without |
| Duplicate | Copies the entity one grid step aside, wires from it included |
| Select Connected | Selects the node and every node a wire joins it to |
| Disconnect All | Deletes every wire into or out of the node in one step. The entities stay |
| Delete Entity | Removes the entity from the map, see Copy, paste and delete |
| Simulate | Fires one of its outputs on paper, see Simulate |
With several nodes selected, Duplicate and Delete act on all of them when you right click one of the selected.
Copy, paste and delete
The graph shows entities of the map, so these keys work on the selected entities, brushes and all, while the pointer is over the graph.
| Key | Does |
|---|---|
| Ctrl+C, Ctrl+V | Copy and paste. The copy lands one grid step from the original, wires and all, since there is no view under the pointer to put it in. Paste with the pointer over a view to place it there |
| Ctrl+D | Duplicate, also one grid step from the original |
| Delete | Removes the selected wire or frame. With none selected it deletes the selected entities from the map, not only their nodes. Wires from other entities to a deleted one turn red. Undo brings everything back |
| Ctrl+A | Selects everything in the map, not only the nodes shown |
Moving around
| To | Do |
|---|---|
| Zoom | Turn the wheel |
| Pan | Drag with the middle or right button. A right click without moving opens a menu, so a shaky pan can pop it up, Escape closes it |
| Select | Click a node, Shift or Ctrl click adds, drag on empty space to box select. The entities are selected in the views and the Outliner too, and the other way round |
| Frame in the views | Double click a node |
| Move | Drag nodes. Their positions are saved in the map |
| Tidy up | Arrange lays out the selected nodes by signal flow. With fewer than two selected, every node goes back to the automatic layout |
| See everything | Fit, or Home with the pointer over the graph |
| See the selection | F with the pointer over the graph frames the selected nodes |
Nodes nobody moved follow the automatic layout, left to right the way signals flow, and the view zooms to fit the panel until you zoom or pan yourself. Once you move a node or wire something in the graph, the others keep their places, and a new node appears next to what it is wired to. Blue and red marker nodes are not entities, so you cannot move them. They sit next to the node that targets them.
Frames
A frame is a titled box behind a group of nodes, to keep a big graph organized: the doors of one building, a puzzle, a cutscene. Select the nodes and press C over the graph, or Frame in the panel's toolbar, then type its title. The Hall lights box in the picture at the top is one.
| To | Do |
|---|---|
| Move a frame with everything inside | Drag its title |
| Resize it | Drag the corner at its bottom right |
| Rename it | Double click its title, or select it and press F2 |
| Recolor or delete it | Right click its title. Deleting a frame keeps its nodes |
Frames are saved in the map as editor data, the Godot build ignores them.
Simulate
Select one entity, press Simulate and pick one of its outputs, or right click a node. The graph numbers every wire the output would set off in yellow, and a list below the graph shows each step by the node titles, in the order the steps arrive, with the time in seconds after the delays. Clear ends the preview. Click a step to select its wire.
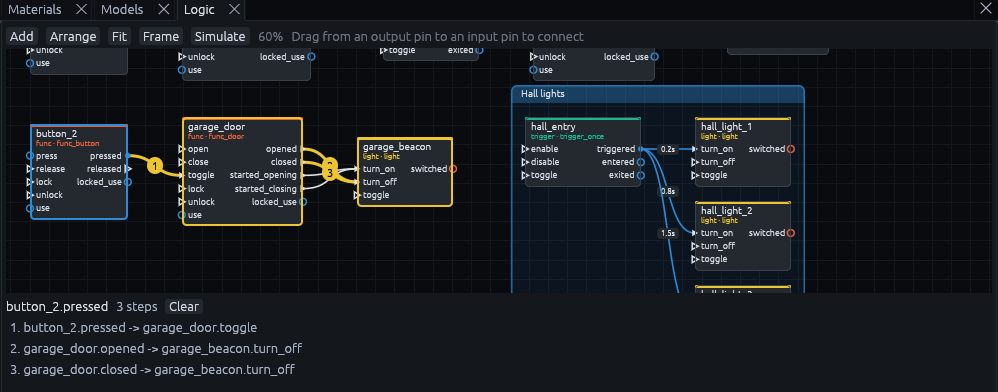
It follows the runtime's rules: targets are found by targetname, and relays, timers, counters, gates, doors and the
other common entities pass the chain on. Runtime targets like !player are shown but not followed.
An entity that fires one of several outputs shows every wire it might set off. Those steps, and everything after them,
end in (maybe) in the list and in ? on the wire's number, and hovering one says what it waits for. A counter fed
by add or subtract continues to hit_max and hit_min this way, since the preview does not count presses: the
step is there, and it happens once the counter reaches its max or min. A logic_sequence fires its steps at the
times of its interval, times and steps properties, so a cutscene reads as a timeline.
Simulate works on paper, without Godot. What really happens in game is covered in Debugging wiring.